Fall is definitely in the air. After a very hot start to the school year, temperatures are finally hinting at the change of season. Eric and I took advantage of a free weekend with cooler temps to do our first try at camping with our motorcycle! The man we bought our original bike from let us borrow his motorcycle camper, and it was fabulous. It was so much better than camping in our tent, and we really enjoyed traveling to the campground on our motorcycle.


Now, on to the menu. Remember, now that it is just the two of us, my menus are much less detailed. We eat a lot of leftovers so that we don't waste food, plus it saves us time on busy nights. Usually one meal will last a couple of days. So, instead of listing my meals by day like I've done in the past, I'm just sharing what I will be cooking during the week and labeling it by the type of entree. Hopefully it is still helpful in providing you ideas for meals to make for your family.

Here's this week's menu. Enjoy and have a great week! Be sure to follow me on Facebook to get fast updates from the blog.

Beef - Steak, Sauteed Zucchini, Salad

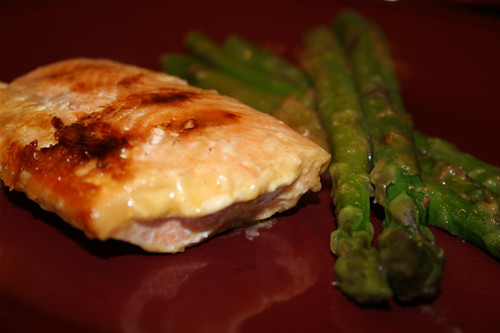
Fish - Honey Dijon Salmon, Green Beans, Salad, Peaches


Chicken - Apple Butter Glazed Chicken, Broccoli, Salad, Applesauce


Beef - Taco Salad (reminder to myself to cook the shells at 400 degrees for 5-7 minutes), Apple slices

Meatless - Veggie Pizza (use this pizza crust recipe), Salad

For more menu ideas, visit orgjunkie.com.


Those of you who regularly read my blog are probably thinking I've fallen of the face of the earth. Not so! I still plan my meals for the week and cook for my family (now just me and my hubby). But, since my son went to college, my schedule and meal planning have changed a little. Just over a year ago, my husband and I got a motorcycle, and it has kind of changed our world. We are just slightly obsessed with riding, and go out every chance we get. We still love to hike and such, but we just take the motorcycle now as our way of travel. So, my weekends haven't left me with as much time to blog.

But, I couldn't sleep tonight, so I thought I'd post my menu for this week. Most things are new recipes, so I'll post photos later once I've made the recipe. I'm not going to specify days, as we eat leftovers a lot since there are just two of us at home now, but here are my meals for the week. Enjoy and have a great week! Be sure to follow me on Facebook to get fast updates from the blog. 

Beef - Chili Spaghetti, Salad, Strawberries
   
Fish - Lemon Parmesan Tilapia, Asparagus, Salad, Strawberries

Meatless - Roasted Veggie and Black Bean Tacos, Salad, Peaches

Beef - Steak, Baked Potatoes, Broccoli, Salad

Chicken - Creamy Broccoli Chicken Shells and Cheese, Salad, Applesauce

Lunch Soup - Potato Ham Chowder

For more menu ideas, visit orgjunkie.com.


A yummy fall treat

Ingredients:

1 3/4 cup + 2 Tbsp all-purpose flour (measure 2 cups remove 2 Tbsp)
1 3/4 tsp baking powder
1 1/4 tsp salt
3/4 tsp ground cinnamon
1/4 tsp ground nutmeg
1/4 tsp ground ginger
3/4 cup granulated sugar
3/4 cup packed light-brown sugar
1/2 cup canola oil
3 large eggs
1 1/2 cups canned pumpkin puree
1 tsp vanilla extract

Coating:
1/3 cup granulated sugar
1 1/4 tsp ground cinnamon

Directions:
Preheat oven to 350 degrees. Butter 18 doughnut wells (3 6-hole pans).

In a mixing bowl whisk together flour, baking powder, salt, cinnamon, nutmeg and ginger for 20 seconds, set aside. In a separate large mixing bowl, whisk together granulated sugar and brown sugar until well combined (break up clumps of brown sugar with fingertips as necessary. You don't want any clumps). Add canola oil, eggs, pumpkin puree and vanilla extract and using an electric hand mixer, blend until mixture is well blended. Add dry ingredients to pumpkin mixture and mix with electric mixer until well combined. Spoon or pipe batter into doughnut wells, filling each about 3/4 full (a scant 1/4 cup in each).

Bake in preheated oven until toothpick inserted into center comes out clean, 13 - 16 minutes. Cool doughnuts slightly. Meanwhile in a large resealable bag shake together 1/3 cup sugar and 1 1/4 tsp cinnamon until well combined. Add one warm doughnut to bag at a time, seal and shake with sugar mixture to coat. Place on wire rack to cool completely. Store in an airtight container.

Recipe Source - Cooking Classy
Nice hearty soup for fall or winter


Ingredients:

2 cups cooked ham, diced into small cubes (I often use turkey ham)
4 slices bacon, cooked and crumbled
5 Tbsp butter, divided
1 medium yellow onion, diced (1 1/2 cups)
2 cloves garlic, minced
2 (14.5 oz) cans low-sodium chicken broth
5 medium red potatoes (1 3/4 lb), diced into 3/4-inch cubes
3/4 tsp dried oregano
1/4 tsp dried thyme
1 bay leaf
Salt and freshly ground black pepper, to taste
1 1/2 cups fresh corn kernels (or frozen)
1/4 cup + 2 Tbsp all-purpose flour
3 cups milk
1/2 cup sour cream
Chives for topping
 
Directions:

In a large pot, melt 1 Tbsp butter over medium heat. Add onion and saute until tender, about 4 minutes. Add garlic and saute for another minute. Add chicken broth, potatoes, oregano, thyme, and bay leaf and season with salt and pepper to taste (slightly under-season with salt as the ham and bacon will add more saltiness to soup). Bring mixture to a boil over medium-high heat, then reduce heat to medium, cover with lid and allow to cook until potatoes are very tender, about 17 - 20 minutes, stirring occasionally. Reduce to warm heat, stir in ham and corn. 

In a medium saucepan, melt remaining 4 Tbsp butter over medium heat. Add flour and cook mixture, stirring constantly, 1 1/2 minutes. While whisking, slowly add in milk, and whisk vigorously to smooth lumps, season with salt and pepper to taste. Bring mixture to a boil and allow to thicken, whisking constantly. Remove from heat, stir in sour cream. Pour and stir milk mixture into soup mixture. Serve warm topped with bacon and chives.

Modified from Cooking Classy
A great meatless taco.


Ingredients:

3 medium tomatoes, cored and seeded, diced* (1 1/2 cups)
2 ears corn, kernels cut from cob (1 1/2 cups)
1 medium zucchini, diced (1 1/2 heaping cups)
1 medium yellow squash, diced (1 1/2 heaping cups)
3/4 small yellow onion, chopped (scant 1 cup)
1 1/2 Tbsp olive oil
1 1/2 Tbsp canola oil
1 tsp cumin
1 tsp chili powder, divided
Salt and freshly ground black pepper
1 cup canned black beans, drained, rinsed and warmed
1/3 cup cilantro, chopped
1 1/2 Tbsp fresh lime juice
Corn or flour tortillas for serving
Queso fresco, for serving
Sour cream and Mexican hot sauce for serving (optional)
 
Directions:
Preheat oven to 400 degrees. Place first 5 ingredients in a mound on a large baking sheet. In a small bowl, stir together olive oil, canola oil, cumin, 1/2 tsp chili powder and salt and pepper (I used 3/4 tsp salt and 1/4 tsp pepper, but you can adjust to your taste). Drizzle oil mixture over veggies on baking dish, then toss to evenly coat and spread veggies into an even layer. Bake in preheated oven 10 minutes, then remove from oven and toss (then spread into an even layer again) and return to oven to roast 10 minutes longer (or until they've reached desired doneness).

Near the end of veggies roasting, toss warmed black beans with salt and remaining 1/2 tsp chili powder. Once veggies are done roasting, add black beans along with chopped cilantro and drizzle lime juice over top and toss. Serve warm over tortillas. Top with Queso Fresco, sour cream and hot sauce if desired.

*Dice all the veggies about the same size so they all cook evenly, except for the tomatoes (and corn obviously). Dice the tomatoes bigger because they shrink the most since they have a higher water content than the others.

Recipe modified from Cooking Classy
Might make a nice fall treat.

Ingredients:


2 1/2 cups all-purpose flour
1 tsp baking powder
1/2 tsp baking soda
1/2 tsp salt
3/4 tsp ground cinnamon
1/4 tsp ground nutmeg
1 cup peeled and shredded Granny Smith apple (from about 2 small)
1 Tbsp lemon juice
1/2 cup unsalted butter, softened
1 cup packed light-brown sugar
1 large egg
1 tsp vanilla extract
1/2 cup (scant - just remove 1 Tbsp) frozen apple juice concentrate, thawed but still cold
1/2 cup packed light-brown sugar
1/4 cup butter
2 1/2 Tbsp apple juice concentrate
1/8 tsp salt
2 1/2 cups powdered sugar
1/2 cup finely chopped pecans
Maldon salt for sprinkling (optional)

Directions:

For the cookies:

Preheat oven to 350 degrees. In a mixing bowl whisk together flour, baking powder, baking soda, salt, cinnamon and nutmeg for 20 seconds, set aside. In a separate bowl, toss shredded apple with lemon juice, set aside.
In the bowl of an electric stand mixer fitted with the paddle attachment, blend together butter and brown sugar until creamy (if not using a paddle attachment that constantly scrapes bowl, then occasionally stop mixer throughout entire mixing process and scrape down sides and bottom of bowl). Mix in egg and vanilla extract. Mix in half of the flour mixture, then with mixer running on low speed, slowly add in apple juice concentrate, then mix in remaining half of the flour mixture. Fold in shredded apples (and the juices with apples). Scoop dough out with a medium 1 1/2-inch cookie scoop and drop onto Silpat or parchment paper lined baking sheets spacing cookies 2-inches apart. Bake in preheated oven 11 - 12 minutes. Cool on baking sheet several minutes then transfer to a wire rack to cool completely.

For the frosting:

In a small saucepan combine brown sugar, butter, apple juice concentrate and salt. Heat mixture over medium heat and cook, whisking constantly, until sugar has dissolved. Remove from heat and whisk in powdered sugar until smooth. Spread over cookies (I recommend a fairly thin layer as this frosting is very sweet), and immediately sprinkle with pecans and Maldon (if using. The frosting will set quickly so don't wait to add toppings). As frosting cools it will thicken, so add 1/2 tsp warm water at a time to thin as needed for a more spreadable consistency. Store cookies in an airtight container at room temperature.

Recipe Source - Cooking Classy

This could be an easy throw-together dinner if you already have some cooked chicken on hand and a package of frozen broccoli.


Ingredients:
9 oz large shell pasta, dry (3 1/4 cups)
1 lb boneless skinless chicken breasts, cooked and shredded into small bites size pieces (or get a rotisserie chicken, remove meat from bones, and dice)
12 oz broccoli florets, diced into small bite size pieces (4 1/2 cups once diced)
2 1/2 Tbsp butter
1/4 cup all-purpose flour
1/2 tsp onion powder
1/4 tsp garlic powder
Salt and freshly ground black pepper
3 cups skim milk
6 oz 2% reduced fat sharp cheddar cheese, shredded (1 1/2 cups)
1 oz Parmesan cheese, finely shredded (1/3 cup)

Directions:
Boil pasta according to directions listed on package adding broccoli during last 3 - 4 minutes of boiling, drain well (reserve 1/4 cup pasta water, just in case you want to thin pasta sauce).

Meanwhile, in a pot melt butter over medium heat then stir in flour. Cook mixture stirring constantly for 1 minute. While whisking vigorously, slowly add in milk, then season with onion powder, garlic powder and salt and pepper to taste. Increase heat to medium-high, cook mixture, stirring constantly until it boils and thickens. Remove from heat, allow to cool for 1 minute then add in cheddar and Parmesan cheese and stir until melted. Add drained pasta and broccoli and chicken and toss to evenly coat. As it sits it will thicken, you can thin it with a few tbsp pasta water if desired.

Recipe Source - Cooking Classy
This recipe was originally a chicken recipe that someone modified to use with fish. I will put the chicken modifications in here as well, as I think it would be good both ways.


Ingredients:

Pasta:
8 oz angel hair pasta
1 tablespoon butter
1 tablespoon grated lemon zest
1/4 cup finely grated Parmesan cheese
salt and pepper, to taste


Fish (or chicken):
4 tilapia filets (4 thin sliced chicken breasts -2 chicken breasts cut in half cross-wise)
1 large egg, beaten with 1 tablespoon water
3/4 cup Panko bread crumbs
1/4 cup finely grated Parmesan cheese
1 teaspoon dried basil
1/2 cup flour (original chicken recipe does not have the flour)
2 tablespoons butter
1/4 cup freshly squeezed lemon juice
1 teaspoon minced garlic
3/4 cup shredded mozzarella cheese


Directions:

Cook the pasta according to the package directions. Reserve 1 cup of the cooking water, then drain. Return the pasta to the pot and stir in the butter, lemon zest, and Parmesan. Season with salt and pepper.

Whisk the egg and water in a shallow dish. In another shallow dish combine the Panko, Parmesan, dried basil, salt and pepper.

Place the flour in a plastic food storage bag. Add the fish (or chicken) filets, seal the bag, and toss to coat the filets in the flour. (The original chicken recipe does not call for the flouring step, though I think it would help with the coating.) Working with one piece at a time, dip a filet into the egg, then into the bread crumb mixture, pressing to adhere the crumbs. Repeat with all the filets.

Heat the butter in a large skillet over medium-high heat. Add the lemon juice and garlic. Add the fish filets and cook for 3-4 minutes per side, until golden brown. Distribute the mozzarella between the 4 filets and cover the pan briefly so the cheese melts. Remove to filets to a plate.

Add the pasta to the pan and toss to coat, thinning the sauce with some of the pasta cooking water. Serve some pasta in a shallow bowl topped with a piece of fish per person.


Note: When making the chicken version, after browning the chicken on both sides for 3-4 minutes, you are supposed to remove them to a plate. Then, spoon the mixed pasta into the skillet. Place the cooked chicken breasts on top. Place lemon slices on top, if using, Sprinkle with mozzarella cheese. Sprinkle top with salt and pepper. Bake 15 minutes, or until the chicken is cooked through. Serve chicken on top of the lemon noodles. 

I think if you are using thin chicken breasts, you can probably skip the baking step. I'm afraid baking would dry out the pasta.  

Recipe Source: A Taste of Home Cooking and Recipe Girl